Interior real estate photography is the professional capture of clean, well-lit images that show the layout, lighting, details, composition, and architectural features of indoor property spaces for real estate marketing. It emphasizes natural light, balanced exposure, and clean composition to make interiors appear open and visually appealing.
Professional real estate photographers use full-frame cameras, wide-angle lenses, stable tripods, and controlled lighting. These tools work together to maintain sharpness, preserve color accuracy, correct vertical lines, and produce distortion-free photos, which strengthens the viewer’s understanding of spatial flow. By capturing textures, shadows, highlights, and focal points with precision, interior photos reflect both the character and the functional layout of a property.
Through a combination of technical skill and visual precision, interior real estate photography helps improve listing performance by providing polished visuals that attract real estate agents and property owners rely on to attract potential buyers. This is just as important in commercial real estate photography, where the goal is to capture the unique features of office spaces, retail environments, and industrial properties. Strong composition, stable framing, and consistent exposure ensure that both residential and commercial spaces are presented in a way that is balanced, inviting, and easy to interpret.
What Equipment Do You Need for Interior Real Estate Photography?
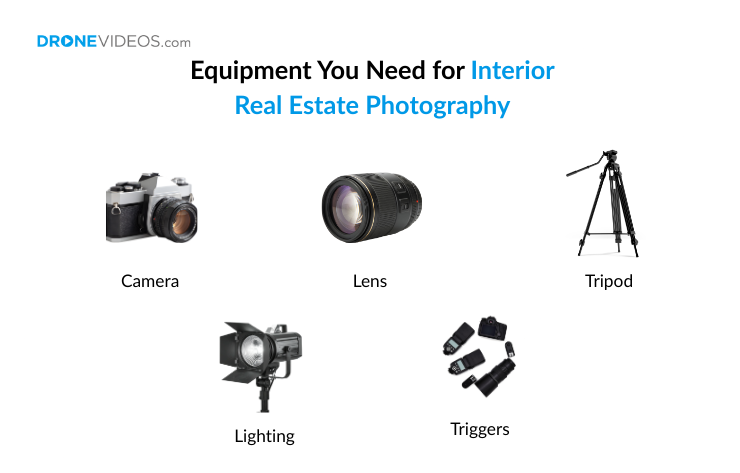
Interior real estate photography requires a camera, a wide-angle lens, a stable tripod, controlled lighting tools, and reliable flash triggers. These must-have real estate photography equipment capture indoor spaces with clarity, balanced exposure, accurate scale, and consistent color. These essential tools help ensure clean composition and preserve room details across various property types, including larger spaces. A well-prepared kit helps produce sharp and corrected interior images suitable for real estate marketing.
Camera
A full-frame or high-performance mirrorless camera is preferred for interior real estate photography because it offers strong dynamic range, detailed image quality, and low-noise results in mixed lighting. These attributes work together to maintain balanced exposure across highlights and shadows, which helps room features appear clear and accurately scaled. The camera’s ability to manage tonal transitions creates a stable base for capturing interiors with clean structure and controlled contrast.
Further consistency in real estate interior photography comes from strong shadow recovery, accurate color, and enough resolution to record architectural detail clearly. These capabilities reinforce one another by preserving textures, controlling shifts in white balance, and maintaining clarity across different rooms. Models such as the Canon EOS R5, Sony A7 IV, and Nikon Z7 II deliver the precision needed for professional interior images.
Lens
Interior real estate photography benefits from an ultra-wide or rectilinear wide-angle lens that captures a broad view of the room while keeping verticals straight and proportions realistic. This wider field of view supports accurate layout representation and helps convey a sense of space, which is essential when working in smaller rooms or photographing interiors with defined architectural features. The lens creates a clear visual structure that strengthens the overall composition.
Reduced distortion, consistent edge clarity, and suitable focal lengths add further value to interior work. These attributes help maintain corrected lines, highlight room flow, and preserve the relationship between furniture and surrounding elements. Popular lens options for interior photography include the Canon RF 15–35mm, Nikon 14–30mm, and Sigma 14–24mm, each designed for sharp, spacious interior images.
Tripod
A sturdy tripod in interior real estate photography stabilizes the camera, strengthens framing accuracy, and supports slow shutter speeds to capture clear, high-quality interior images. Its stability keeps verticals straight, preserves clean composition, and prevents motion-related softness when recording room details in low-light conditions. Adjustable height and reliable leveling help maintain alignment across different flooring surfaces and interior layouts.
Stronger support components, such as firm leg locks, controlled column adjustments, and precise tripod heads, improve overall alignment and scale accuracy in interior photographs. These features work together to keep corrected lines consistent across the frame and maintain clarity during multi-exposure captures. Tripods like the Manfrotto 190XPRO, Benro Mach3, and Gitzo Traveler offer the dependable structure required for sharp and well-organized interior photos.
Lighting
Interior real estate photography requires controlled lighting to create balanced exposure, reduce heavy contrast, and brighten interior areas that natural light cannot reach. Effective lighting control strengthens the visual structure of a room by supporting accurate color and revealing texture in walls, furniture, and architectural features. As the light evens out across highlights and shadowed corners, each space appears clearer and more consistent, which improves how viewers interpret scale and layout.
Continuous LED panels, softboxes, and bounced flash units build on this foundation by shaping the light in a way that maintains corrected tones throughout the frame. These tools work together to control shadows, stabilize white balance, and support clean transitions across mixed interior lighting. Equipment such as the Godox SL60W, Aputure 120D, and compact bounced-flash systems remains common in professional interior workflows for its reliability and clarity.
Triggers
Wireless triggers in interior real estate photography fire external flashes consistently and maintain controlled lighting across a room. Reliable triggering keeps each flash synchronized with the camera exposure, which supports clean illumination and prevents timing issues that create uneven lighting or motion-related softness. Strategic placement of flashes around furniture and architectural features becomes easier when triggers activate lights without requiring direct access to the camera.
Workflow stability in real estate interior photography improves further when triggers offer a strong signal range, secure channel settings, and responsive communication. These features help maintain accurate lighting during bracketed captures and multi-frame sequences. Common trigger options include the Godox XPro, PocketWizard Plus III, and Yongnuo RF-605, each suited for professional interior environments.
What Are the Best Camera Settings for Interior Real Estate Photography?
The best camera settings for interior real estate photography use ISO 100–400 for clean detail, f/8–f/11 for room-wide sharpness, 1/60-1/125 second shutter speeds for balanced exposure, and matrix or evaluative metering for accurate indoor light measurement. These settings work together to control noise, preserve detail, and manage bright windows and shadowed corners. A –2/0/+2 EV bracket and a stable manual mode further support balanced interior photos, aligning with proven camera settings for real estate photography that maintain clarity, tonal accuracy, and consistent exposure across a full property.
What Is the Best ISO for Interior Real Estate Photography?
The best ISO settings for interior real estate photography are ISO 100–400 for clean, noise-free interior detail.
ISO 100–200 works well in rooms with strong window light or controlled artificial lighting because it preserves color accuracy, protects shadow detail, and maintains clarity in bright areas. ISO 200–400 becomes useful in dimmer interiors where shutter speed and aperture need support to maintain balanced exposure without introducing noise.
Higher ISO values should be used only when lighting is extremely limited, as staying close to base ISO levels ensures sharper and more consistent interior images suited for real estate marketing.
What Is the Best Aperture for Interior Real Estate Photography?
The best aperture for interior real estate photography is f/8–f/11, which provides room-wide sharpness and consistent focus across the frame. This range keeps architectural lines, furniture, and background elements clear while maintaining accurate scale.
Lower apertures, such as f/5.6, may be used in dim rooms to collect more light, while higher apertures like f/13 can help control highlights in bright interiors, though both alternatives risk reduced sharpness. Working within f/8–f/11 offers the best balance of detail, clarity, and depth for professional interior images.
What Shutter Speed Should You Use for Interior Real Estate Photography?
The best shutter speeds for interior real estate photography fall between 1/60 and 1/125th of a second, which helps maintain balanced exposure when using flash or controlled artificial lighting. This range supports clean highlights, preserves room detail, and prevents motion-related softness while keeping the exposure stable across mixed indoor conditions.
Shutter speeds near 1/60 allow more ambient light to fill the room, while speeds toward 1/125th help control bright window areas or reflective surfaces. Working within this range produces consistent interior images with smooth tonal transitions, accurate highlights, and clear architectural detail across the frame.
Which Metering Mode Is Best for Interior Real Estate Photography?
The best metering mode for interior real estate photography is matrix or evaluative metering, which measures the entire frame to produce balanced exposure in mixed indoor lighting. This full-scene analysis helps maintain clean highlights and stable midtones while keeping shadow detail intact.
Manual mode with spot metering is useful when a specific highlight, shadow, or reflective surface needs targeted exposure control. By metering a single point and locking exposure manually, photographers maintain consistent results across the full room.
Exposure bracketing (AEB) works effectively with both approaches by capturing multiple exposures such as –2, 0, and +2 EV. AEB preserves window detail and interior shadow structure, making it ideal for high-contrast rooms and HDR interior workflows.
What Is the Best Auto Exposure Bracketing for Interior Real Estate Photography?
The best auto exposure bracketing for interior real estate photography ranges from –2 EV to +2 EV, which captures the full tonal range in mixed interior lighting. This spread records shadow detail, midtone clarity, and controlled highlights in a balanced set of images.
A –2 EV frame protects window detail and prevents blown highlights, while the 0 EV frame establishes the base exposure for furniture, walls, and room layout. The +2 EV frame brightens shadowed areas and helps preserve texture in darker regions of the interior.
These three exposures blend cleanly in HDR workflows and create a realistic, well-balanced interior image set. Bracketing also supports consistent results across rooms with mixed lighting or strong contrast.
Which Mode Is Best for Interior Real Estate Photography?
The best mode for interior real estate photography is manual or Aperture Priority (Av) mode, which keeps ISO, aperture, and shutter speed stable across every room.
Manual mode control supports consistent exposure, especially when interiors have mixed lighting from windows and artificial sources. Locking each setting also prevents shifts in brightness or color that can appear when the camera evaluates different scenes independently.
Aperture Priority mode can be used in evenly lit rooms when consistent depth of field is the main priority, but manual mode remains the most reliable for professional interior work.
15 Best Interior Real Estate Photography Tips
Effective interior real estate photography relies on techniques that improve lighting balance, strengthen composition, maintain accurate perspective, and preserve clean detail across different rooms. These guiding points help real estate photographers manage mixed lighting, tight layouts, reflections, and contrast while keeping interiors clear, well-structured, and visually consistent for real estate marketing.
5 Best Lighting Tips for Interior Real Estate Photography
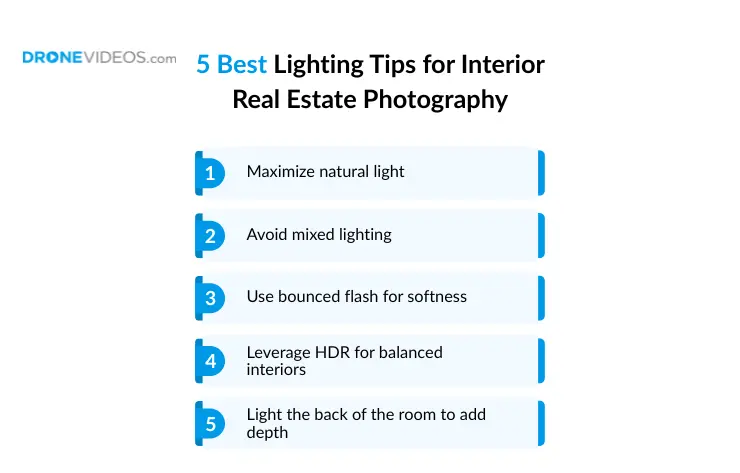
- Maximize natural light
Use window light as your primary source to keep the interior looking natural and evenly illuminated. Open blinds, pull curtains aside, and allow the room to fill with soft daylight before setting additional lights. - Avoid mixed lighting
Turn off lights with different color temperatures so the interior maintains a consistent white balance. Keeping all sources uniform prevents unwanted color shifts on walls, flooring, and furniture.
- Use bounced flash for softness
Aim your flash at a ceiling or wall to spread light across the room instead of pointing it directly at the subject. This creates softer highlights, reduces harsh shadows, and keeps interior details clean.
- Leverage HDR for balanced interiors
Capture a bracketed set to hold window detail and shadow information in the same scene. HDR is especially effective in real interiors where bright windows and dark corners compete for exposure.
- Light the back of the room to add depth
Place a small light source behind the camera or toward the far end of the interior to brighten deeper areas. This keeps the room from appearing flat and helps create a stronger sense of openness in real estate photos.
5 Best Tripods Placement Tips for Interior Real Estate Photography
- Position at chest height (around 4–5 feet)
Set the tripod at chest height to achieve a natural viewing angle in interior real estate photography and keep ceilings and floors evenly balanced in the frame. - Keep the camera perfectly level
Use the tripod’s built-in level to ensure all vertical lines stay straight. Leveling the camera avoids distortion along walls, windows, and furniture, which is critical for accurate interior representation. - Adjust height based on room features
Shift tripod height to match the room type. Lower the tripod slightly for kitchens, bathrooms, or tight spaces, and raise it slightly higher for larger living areas. Small height adjustments help emphasize layout without exaggerating scale. - Use a self-timer or remote release
Trigger the shutter without touching the camera to eliminate even the smallest vibrations. This produces sharper images in interior settings, especially during long exposures or HDR bracketing. - Lock tripod legs firmly to prevent micro-shifts during bracketing
Secure each leg before shooting to avoid subtle movement between frames. Solid leg locks ensure bracketed exposures in real estate interior photography align cleanly in HDR processing with consistent detail.
5 Best Composition Tips for Interior Real Estate Photography
- Maintain straight vertical and horizontal in frame
Keep the camera aligned so walls, door frames, and windows stay straight, which is essential in interior real estate photography for preserving architectural accuracy and avoiding visual distortion. - Shoot from corners or key vantage points
Position the camera in corners or strategic viewpoints to reveal more of the room and strengthen depth, a common technique used to show layout effectively in interior photography. - Highlight the room flow by showing connecting spaces
Include doorways, openings, or transitions so real estate interior photography communicates how rooms connect, helping viewers visualize the overall property layout. - Include key furniture to provide scale and context
Use furniture pieces to anchor proportions and clarify room size, giving interior real estate photography a clear reference point for understanding space. - Choose angles that minimise clutter and avoid reflections
Adjust camera placement to hide distracting objects and prevent reflections in mirrors or glossy surfaces, ensuring the composition remains clean and professional for real estate interior photography.
What Is the Price of Interior Real Estate Photography?
Interior real estate photography cost typically ranges from $150 to $500. Real estate photographers charge between $75 and $150 per hour for custom shoots or properties requiring extended lighting setup. Pricing increases as property size, lighting conditions, and coverage needs become more complex. Smaller condos sit near the lower end, mid-size homes fall in the mid-range, and large or luxury properties often require more time, lighting, and detail. Empty homes may require additional lighting support, which can raise the total cost.
Across different housing categories, cost shifts based on the number of rooms photographed, layout complexity, and the level of editing required. The broader real estate photography cost landscape follows the same pattern, where larger interiors with multiple lighting challenges or strong architectural features fall into higher tiers because they require more exposures, controlled lighting, and extended post-processing.
Package-Based Interior Real Estate Pricing:
- Basic Package: $100–$300
Includes 15–25 interior photos, essential coverage for small homes or condos, standard angles, and basic color correction.
Best for straightforward shoots where minimal lighting adjustment is needed.
- Standard Package: $300–$600
Includes 25–35 interior photos, full-room coverage, balanced lighting, multiple compositions per room, and standard HDR processing.
Suitable for typical single-family homes needing consistent exposure and clear room documentation.
- Premium Package: $500–$1,200+
Includes 35–50 interior photos, advanced lighting control, detailed compositions, multi-exposure bracketing, and extended editing.
Ideal for large homes, luxury interiors, or architect-designed spaces that require refined detail and accurate tone.
- Optional Add-ons:
-
- Drone Photography: $150-$1,000
- HDR Processing: +$25–$75
- Advanced Editing: +$50–$150
- Virtual Staging: $30–$80 per photo
- 3D Virtual Tours: $200 and $700
What Is the Difference Between Real Estate Photography and Interior Photography?
Real estate photography focuses on documenting the entire property with clear scale and layout, whereas interior photography concentrates on design detail, controlled lighting, and refined composition within individual rooms.
A key distinction lies in how each approach handles coverage and visual intent. Real estate photography uses wider angles and consistent exposure to show how spaces connect throughout the property. Interior photography, on the other hand, uses selective framing and precise lighting to highlight textures, furnishings, and architectural elements. These differences determine whether the goal is to present overall property flow or emphasize stylistic interior design features.