The best camera settings for real estate photography include an aperture of f/8–f/11, ISO 100–400, and shutter speeds around 1/60–1/125 seconds. These camera settings work together to keep rooms sharp, exposures balanced, and image noise low across both interior and exterior scenes.
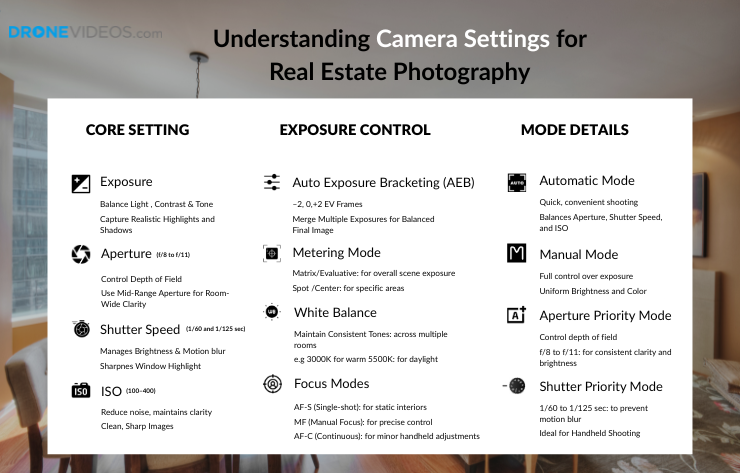
Strong real estate images come from understanding the relationship between exposure, lighting, and camera control. The aperture defines depth of field and ensures structural clarity, the shutter speed regulates brightness and motion stability, and ISO adjusts the camera’s sensor sensitivity to manage available light. These three attributes form the exposure triangle, providing the framework for consistent tone, contrast, and clarity across varying lighting conditions.
To achieve a natural, professional finish, real estate photographers must also balance metering mode, white balance, and focus precision to adapt to mixed lighting. Using auto exposure bracketing helps capture dynamic range in high-contrast scenes, while the RAW format preserves full image data for post-processing. Combined, these settings deliver crisp, balanced, and natural photos that accurately convey space, detail, and atmosphere in every real estate image.
Understanding Camera Settings for Real Estate Photography
For real estate photography, aim to balance aperture, shutter speed, ISO, and auto exposure to achieve even lighting and natural detail. These camera settings together shape brightness, contrast, and sharpness, helping each real estate image look true to the property’s actual lighting. A well-balanced setup keeps tones consistent, avoids overexposure, and delivers crisp, balanced, and professional results across all interior and exterior shots.
Exposure Light Setting for Real Estate Photography
Exposure determines how much light is captured in a real estate photograph, shaping the overall brightness and contrast of the image. Property scenes often include bright windows, darker interiors, and outdoor light that creates deep shadows, making balanced exposure essential for accuracy. By managing exposure carefully, real estate photographers establish the foundation for how every detail, tone, and highlight appears, directly influencing the realism of the final real estate image.
Aperture
Aperture is the lens opening that determines how much light enters the camera and how much of the real estate scene appears in focus. It directly controls the depth of field, helping maintain sharpness from foreground to background.
In real estate photography, using a mid-range aperture such as f/8 to f/11 provides room-wide clarity while balancing brightness and detail. A smaller opening (higher f-stop) increases focus across large spaces, while a slightly wider one (lower f-stop) allows more light in dim interiors. For instance, photographing a small bedroom at around f/8 keeps furniture in the front and walls in the back equally sharp. Aperture works together with shutter speed and ISO to control exposure, making it one of the most important camera settings for creating realistic, well-lit, and detailed real estate images.
Shutter Speed
Shutter speed determines how long the camera’s sensor is exposed to light, directly influencing brightness and motion clarity in real estate photography. Slower speeds allow more light in for dim interiors, while faster speeds prevent overexposure in bright spaces. A balanced range between 1/60 and 1/125 seconds helps maintain clean, stable results across most property conditions.
For example, using a slower speed around 1/60 second helps capture soft, even lighting in a shaded living room, while a faster speed near 1/125 second keeps window highlights sharp in brighter spaces. Combined with aperture and ISO, shutter speed ensures natural exposure, detailed tones, and balanced lighting throughout every real estate image.
ISO
ISO controls the camera’s sensor sensitivity to light, helping real estate photographers manage exposure and brightness in varying lighting conditions. Lower ISO settings, such as 100–200, create clean, sharp images in bright interiors or well-lit rooms, preserving natural color and fine detail. In contrast, moderate values like 200–400 are useful in dimmer areas, maintaining balanced exposure without noticeable noise.
For example, shooting a hallway or small bedroom at ISO 200 can keep brightness consistent while retaining definition in both highlights and shadows. Higher ISO values may brighten darker corners but risk adding grain and reducing clarity. When adjusted in coordination with aperture and shutter speed, ISO ensures smooth tonal balance and natural texture across all real estate photos.
Auto Exposure Bracketing
Auto Exposure Bracketing (AEB) captures multiple images at different exposure levels to balance lighting in real estate photography. It is most effective in mixed lighting scenes, such as interiors with bright windows and darker corners. A common bracket of –2 EV, 0 EV, and +2 EV records details in highlights, midtones, and shadows for a complete tonal range. For example, the –2 EV frame protects bright window areas, while the +2 EV frame recovers detail in shadowed spaces. These exposures can be merged in editing to create a single, well-balanced image. AEB ensures dynamic range, tonal accuracy, and consistent lighting throughout property photos.
Metering Mode
Metering mode determines how the camera measures light across a scene, guiding exposure decisions in real estate photography. Because property interiors often mix bright windows with darker walls, accurate light measurement is essential for balanced results. Matrix or evaluative metering analyzes the entire frame to produce even exposure, while center-weighted or spot metering focuses on specific areas needing precise control. For example, metering from a bright window can help prevent blown highlights. Choosing the right metering mode helps maintain consistent brightness, clear detail, and balanced lighting across both interior and exterior property images.
White Balance
White balance controls how color temperature is recorded in real estate photography, ensuring whites appear neutral and room tones look natural. Real estate properties often feature mixed lighting, such as daylight from windows combined with warm indoor bulbs, which can distort colors if not corrected. Setting the white balance manually or using appropriate presets helps achieve accurate color representation.
For example, a 3000K setting suits warm interior lighting, while 5500K aligns with daylight conditions. Adjusting white balance maintains consistent tones across multiple rooms, prevents color shifts between shots, and supports a realistic presentation of walls, flooring, and decor for a balanced and professional look throughout the real estate property.
Focus Modes
Focus modes define how the camera locks onto subjects, ensuring sharp and consistent detail in real estate photography. Since property scenes are static, accuracy and stability are more important than speed. Single-shot autofocus (AF-S) is effective for capturing still interiors, while manual focus (MF) allows fine control over architectural lines and furnishings. Continuous autofocus (AF-C) is rarely necessary unless minor adjustments are needed during handheld shooting. For example, using AF-S to focus on a central area like a kitchen island ensures the entire frame remains clear. Choosing the right focus mode guarantees crisp edges, defined textures, and consistent clarity across all real estate images.
Exposure Modes
Exposure modes control how the camera manages aperture, shutter speed, and ISO to achieve the correct brightness in real estate photography. These modes define the balance between automation and manual control, helping real estate photographers adapt to different lighting conditions. Automatic mode adjusts all settings for convenience but can vary exposure between rooms, while Manual mode maintains consistent lighting across a full property. Semi-automatic options like Aperture Priority and Shutter Priority provide partial control, letting the camera fine-tune brightness. Selecting the right mode creates a smooth workflow, consistent tones, and balanced images that accurately represent both interiors and exteriors.
Automatic Mode
In real estate photography, automatic mode lets the camera choose aperture, shutter speed, and ISO to balance lighting and maintain proper exposure. It is useful for quick shooting when lighting changes between indoor and outdoor areas. While convenient, this mode often produces slight variations in brightness and color from one room to another. Automatic mode is ideal for speed and simplicity, but offers limited consistency for professional property images that require uniform tone and lighting.
Manual Mode
When lighting consistency matters, manual mode is the most reliable choice for real estate photography. It gives the real estate photographer complete control over aperture, shutter speed, and ISO, allowing precise exposure adjustments for every scene. This mode is especially effective for interiors where natural and artificial light mix, helping maintain uniform brightness and color across multiple rooms. By keeping exposure fixed, photographers achieve consistent tones and balanced contrast throughout a property. Though it requires more attention, manual mode produces professional, repeatable results that automation cannot ensure.
Aperture Priority Mode
For real estate photographers aiming to control depth and clarity in images, aperture priority mode offers control over depth of field while the camera automatically adjusts shutter speed for proper exposure. This mode keeps entire rooms sharp from foreground to background, ideal for wide interior shots. Setting an aperture around f/8 to f/11 provides consistent clarity and balanced brightness. Aperture priority mode helps maintain focus accuracy and natural exposure across changing lighting conditions in both indoor and outdoor scenes.
Shutter Priority Mode
When managing motion, brightness, and light stability in real estate photography, Shutter Priority mode provides flexible exposure control. It allows real estate photographers to set the shutter speed manually while the camera adjusts the aperture to achieve proper lighting. Speeds around 1/60 to 1/125 second help maintain sharpness and prevent motion blur in bright or changing light. This mode is especially effective for handheld shooting and ensuring consistent exposure across multiple property scenes.
Why Should You Shoot in RAW for Real Estate Photography?
Shooting in RAW format for real estate photography provides greater dynamic range, color accuracy, and editing flexibility. RAW files store all data captured by the camera’s sensor, allowing real estate photographers to recover details from bright highlights and dark shadows that JPEG files often lose. This makes it easier to correct exposure, adjust white balance, and fine-tune tones without degrading image quality. For example, details in a bright window or dim corner can be restored seamlessly during editing. Shooting in RAW ensures consistent brightness, natural color, and high-resolution detail across every property image, producing results that look balanced and professionally refined.
What Are the Best Camera Settings for Interior Real Estate Photography?
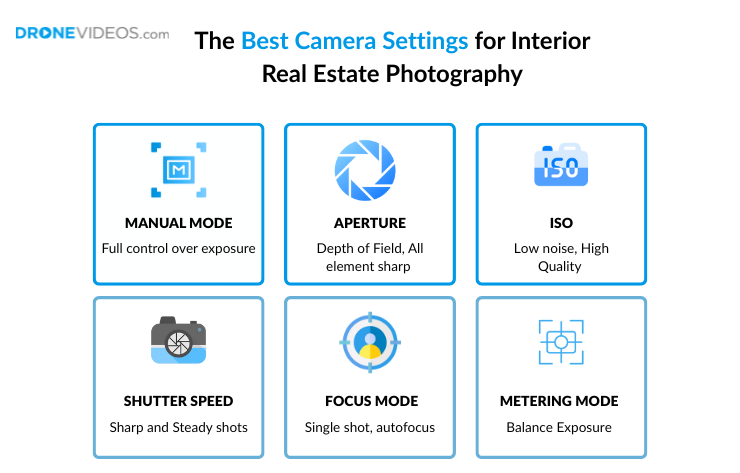
The best camera settings for interior real estate photography are manual mode, an aperture of f/8–f/11, ISO 100–400, shutter speeds between 1/60 and 1/125 second, single-shot autofocus (AF-S), and matrix or evaluative metering. This setup keeps interiors evenly lit, sharp, and free of noise while maintaining accurate color and brightness. Manual mode control ensures consistent exposure across rooms, and precise metering captures balanced tones. These camera settings also perform well in commercial real estate photography, where larger interiors need uniform lighting and realistic color across the entire frame.
Which Camera Mode Is Best for Interior Real Estate Photography?
The best camera mode for interior real estate photography is manual mode, as it provides full control over aperture, shutter speed, and ISO for consistent exposure across all rooms. This control prevents brightness or color shifts that can occur when lighting changes between natural and artificial sources.
Aperture Priority mode is a useful alternative in evenly lit spaces, maintaining depth of field while automatically adjusting brightness. For both residential and commercial real estate photography, manual mode ensures accurate lighting, balanced color, and uniform tone across every interior shot.
What Is the Best Aperture for Interior Real Estate Photography?
The best aperture for interior real estate photography is between f/8 and f/11, providing sharp focus from the foreground to the background while maintaining balanced brightness. This range ensures clear architectural lines, detailed textures, and consistent depth throughout the room. In dimly lit interiors, a slightly wider aperture such as f/5.6 can help gather more light, while smaller apertures like f/13 can control highlights in bright areas. Using f/8–f/11 creates evenly focused, natural-looking images ideal for residential and commercial real estate photography, where clarity and accurate scale are essential.
What Is the Best ISO for Interior Real Estate Photography?
The best ISO for interior real estate photography is ISO 100-400, which keeps images bright while minimizing digital noise. ISO 100–200 works well in well-lit interiors or when using additional lighting, preserving fine detail and accurate color. For dimmer spaces, ISO 200–400 provides the extra sensitivity needed without compromising clarity. Higher ISO values should only be used in very dark areas, as they can introduce unwanted grain. Staying within this range ensures clean, natural, and sharp interior images suitable for both residential and commercial real estate photography.
What Is the Best Shutter Speed for Interior Real Estate Photography?
The best shutter speed for interior real estate photography is between 1/60 and 1/125 second, providing balanced exposure and sharp detail in controlled lighting. A slower speed, such as 1/60 second, allows more ambient light into darker rooms, while a faster speed, like 1/125 second, helps control brightness in well-lit spaces or near windows. Using a tripod ensures stability at slower speeds, preventing camera shake and motion blur. This range maintains consistent lighting and clear architectural definition, producing smooth, professional results for both residential and commercial real estate photography.
Which Focus Mode Is Best for Interior Real Estate Photography?
The best metering mode for interior real estate photography is matrix or evaluative metering, as it measures light across the entire frame to produce balanced exposure in mixed lighting conditions. This mode helps manage contrast between bright windows and darker interior areas, ensuring detail is retained in both.
For greater precision, spot metering can be used when controlling exposure for specific highlights or reflective surfaces. Combining manual mode with matrix metering allows for consistent tone and brightness throughout multiple rooms. This approach ensures evenly lit, professional results for both residential and commercial real estate photography.
What Is the Best Metering Mode for Interior Real Estate Photography?
The best metering mode for interior real estate photography is matrix or evaluative metering, as it reads light from multiple areas of the frame to calculate an even exposure. This approach helps balance the difference between bright window light and shadowed corners, keeping details visible throughout the room.
For scenes with strong highlights or reflective surfaces, spot metering can be used to fine-tune exposure on specific areas. Combining manual mode with matrix metering provides consistent brightness and color across every shot, producing clean, evenly lit interiors ideal for residential and commercial real estate photography.
What Are the Best Camera Settings for Exterior Real Estate Photography?
The best camera settings for exterior real estate photography include an aperture of f/8–f/11, ISO 100-200, and shutter speeds between 1/125 and 1/250 second. These camera settings perform effectively for both daytime and twilight exterior shoots. During the day, they maintain clarity in bright sunlight, while matrix or evaluative metering helps balance exposure between the sky and the building. At twilight, lowering the shutter speed to around 1/30–1/60 second and increasing ISO to 200–400 preserves color warmth and detail as natural light fades. In real estate photography, these controlled adjustments support accurate exposure and consistent visual presentation across residential and commercial exteriors.
Daytime Exteriors Real Estate Photography
For daytime exterior real estate photography, set camera settings to manual mode, an aperture of f/8–f/11, ISO 100, and shutter speeds between 1/125 and 1/250 second. This setup keeps the property sharp and evenly lit in bright sunlight while maintaining accurate color. Matrix or evaluative metering helps balance exposure between the sky and the building, preventing overexposed highlights. Using a tripod ensures stability and consistent framing. These camera settings produce professional-quality exterior photos with natural tones and clear architectural detail suitable for both residential and commercial real estate marketing.
Which Camera Mode Is Best for Daytime Exterior Real Estate Photography?
The best camera mode for daytime exterior real estate photography is manual mode, giving full control over aperture, shutter speed, and ISO to handle bright daylight and strong contrast. It ensures consistent exposure and accurate color across all shots. Aperture Priority mode is also effective when light changes, keeping depth of field steady while the camera adjusts brightness automatically. Combined with matrix metering, these modes deliver crisp, evenly exposed images that highlight both sky and structure with professional clarity.
What Is the Best Aperture for Daytime Exterior Real Estate Photography?
The best aperture for daytime exterior real estate photography is between f/8 and f/11, which provides full-scene sharpness and balanced brightness in daylight. This range keeps the property and background evenly focused while preserving detail in bright areas. Using f/8 allows slightly more light for shaded exteriors, while f/11 controls highlights in stronger sunlight. These values create textured, detailed, and professional outdoor images ideal for residential and commercial real estate listings.
What Is the Best ISO for Daytime Exterior Real Estate Photography?
The best ISO for daytime exterior real estate photography is ISO 100, which produces the cleanest, sharpest images with maximum color accuracy. In bright daylight, a low ISO keeps noise to a minimum and preserves fine architectural details. If shooting under partial shade or softer light, increasing slightly to ISO 200 can maintain proper brightness. Staying close to base ISO ensures defined, well-exposed images that highlight property textures and color naturally for both residential and commercial real estate exteriors.
What Is the Best Shutter Speed for Daytime Exterior Real Estate Photography?
The best shutter speed for daytime exterior real estate photography is between 1/125 and 1/250 second, producing sharp, evenly lit images while preventing motion blur in bright conditions. This range maintains clarity in both the property and the sky. In shaded or lower-contrast light, slowing to around 1/100 second helps capture a wider dynamic range, preserving detail in highlights and shadows. Using a tripod ensures stability, resulting in clean, balanced exterior photos for residential and commercial real estate listings.
Which Focus Mode Is Best for Daytime Exterior Real Estate Photography?
The best focus mode for daytime exterior real estate photography is single-shot autofocus (AF-S), which locks focus accurately on the property and maintains stability throughout the shot. Using Back Button Focus (BBF) adds control by separating focus from the shutter, making it easier to recompose without refocusing. For scenes with layered depth or detailed foregrounds, manual focus provides precision. These methods ensure crisp, stable, and well-defined exterior images for both residential and commercial real estate photography.
What Is the Best Metering Mode for Daytime Exterior Real Estate Photography?
The best metering mode for daytime exterior real estate photography is matrix or evaluative metering, which balances exposure between bright skies and shaded areas. This mode prevents blown highlights and maintains detail across the frame. In stronger sunlight or reflective conditions, highlight-weighted metering or manual adjustment can preserve sky color and texture. Together, these methods ensure accurate lighting, a wide dynamic range, and crisp, natural-looking exterior images for both residential and commercial real estate properties.
Twilight Exteriors Real Estate Photography
For the best twilight exterior real estate photography, set an aperture of f/8–f/11, ISO 100–400, and shutter speeds between 1 and 10 seconds. This combination captures the perfect balance between the property’s artificial lighting and the soft blue tones of the evening sky. Matrix or highlight-weighted metering helps preserve highlight and shadow detail for greater dynamic range. A tripod is essential for stability during long exposures, resulting in crisp, color-rich twilight photos ideal for residential and commercial real estate marketing.
Which Camera Mode Is Best for Twilight Exterior Real Estate Photography?
The best camera mode for twilight exterior real estate photography is manual mode, giving full control over aperture, shutter speed, and ISO to balance fading daylight with property lighting. Slower shutter speeds between 1 and 10 seconds capture smooth tones and rich color. Using highlight-weighted metering, bracketing, and a tripod helps retain detail in both the sky and illuminated areas, producing crisp, balanced twilight images for residential and commercial real estate properties.
What Is the Best Aperture for Twilight Exterior Real Estate Photography?
The best aperture for twilight exterior real estate photography is between f/8 and f/11, providing sharpness and consistent depth across the scene. This range keeps both the property and sky clear while balancing the warm glow of lights with the cool twilight tones. A smaller aperture, such as f/11, preserves highlight detail, while f/8 allows slightly more light for softer transitions. Combined with a tripod and bracketing, these settings create immaculate, well-balanced twilight photos.
What Is the Best ISO for Twilight Exterior Real Estate Photography?
The best ISO for twilight exterior real estate photography is between ISO 100 and 400, providing a clean, detailed image while maintaining accurate color as daylight fades. Lower values like ISO 100 or 200 work best early in the evening, while ISO 400 helps capture balanced exposure as light drops. In very low light conditions, you might slightly increase ISO to 800 or 1600 to preserve brightness and capture noise-free twilight photos without losing key details.
What Is the Best Shutter Speed for Twilight Exterior Real Estate Photography?
For twilight exterior real estate photography, the best shutter speed ranges between 1 and 10 seconds, helping balance artificial lighting with the soft blue tones of the evening sky. For early twilight, use around 1–4 seconds to maintain natural color and detail. In deep twilight or night, extend exposures to 10–30 seconds for richer tones and fuller illumination. Always use a tripod to prevent blur and consider bracketing to expand dynamic range, producing crisp, evenly lit twilight photos.
Which Focus Mode Is Best for Twilight Exterior Real Estate Photography?
The best focus mode for twilight exterior real estate photography is Manual Focus (MF) for precision and Single-Point Autofocus (AF-S/One-Shot) for speed. Manual Focus, combined with a tripod and Live View’s zoom, ensures exact sharpness when light is low. AF-S is useful for quickly locking onto bright areas like windows or entryways.
What Is the Best Metering Mode for Twilight Exterior Real Estate Photography?
The best metering mode for twilight exterior real estate photography is highlight-weighted metering that preserves bright light sources like windows and exterior fixtures without overexposing them. Modes such as matrix/evaluative metering work well for balancing exposure across the entire scene, while spot metering can fine-tune exposure on specific bright or shadowed areas. Use the histogram to confirm that highlights are not clipped and shadows retain texture.